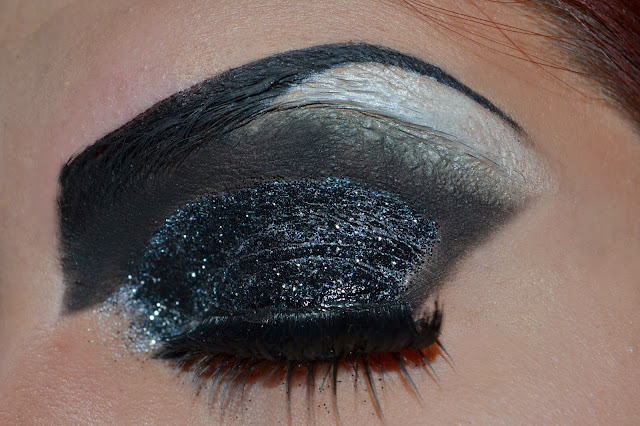
So, Once Upon a Time is an amazing show. I was finding season four a little so-so, up until they decided that the second half of the season was going to be about the sassiest bitches in fairytale land. Maleficent, Ursula and Cruella De Vil. Now, Cruella isn't an evil witch, she's just a bad person, period, and I sort of love that. Her style is also flawless, and considering I haven't driven a car since I passed my test two years, I imagine I would drive much like she does. She's a bit of an idol for me, and I love how the show portrayed her. Thus, this make up.
For this look I wanted to go somewhere between Once Upon a Time Cruella and the Disney version, with a touch of drag, cos that obsession has not gone away. You will need a glue stick.
To start with, those brows. First, brush the outer half of your brows upwards, making sure they are all in a uniform direction. Then, take a glue stick the dries clear and work it over that half the of the brow. Keep adding glue until the texture looks smooth, you can use water to smooth is a little (just dip your finger in the water and run it over the glue). Now set this with a loose, translucent powder. Next, cover this with foundation and leave to set.
For the colour, I started with a black eye shadow by Inglot and a fine, angled brush. I wanted the brows to be thick and angular, so I started by defining and exaggerated inner brow with the shadow, taking the line down the bridge of the nose a little ways. Then fill in the brows up until the arch, going beyond your natural arch and creating an exaggerated curve. Make sure the tail is nice and fine (I use an assortment of cotton buds and make up wipes to achieve this). With the shape established, I went over it with liquid liner for intensity and sharpness.
Now, skin. I started with Benefit's Porefessional to prime, I then applied Bourjois's 123 Perfect Foundation. I then used Sleek's Cream Blush in Newport Peach on the apples of my cheeks, as I wanted the cheeks to look quite rounded. Now, contouring is a big ol' deal with this look. Cruella's cheekbones are quite something, to say the least. For this, I took Sleek's contour kit and a medium sized, flat brush, which is smaller than my typical brush, because I want the contour to be a bit more intense. I contoured my cheeks, extending the line further than I typically would, and curving it under my cheek a little, making my cheeks look more rounded and defined. I blended this out using a larger, angled, fluffy brush, but went in again with the smaller brush to keep the definition. I also contoured my nose, under my jaw and my temples. I then highlighted my cheekbones, the tip and bridge of my nose, my chin and above the arches of my brows using the highlighter in Sleek's Contour Kit. I finished by setting everything with Mac's Prep and Prime Transparent Finishing Powder.
For lips I used Sleek's Matte Me liquid lipstick in Rioja Red.
Now, these intense ass eyes. I started by priming with Two Faced Shadow Insurance. I then took a stiff pencil brush and an Inglot black eye shadow to define the cut crease, making sure the outer edge has a sharp edge and that the inner corner blends into the brow. I blended it out with a fluffy brush the best I could, considering the glue stick. I then used Maybelline's Color Tattoo in Light in Purple over my lid as a base. Over that I used Collection's Glam Crystals Glitter Liner in Rock Chick as a base for Stargazer's Glitter Shaker in Onix, which I patted over the top. I then used Nyx's Jumbo Eye Pencil in Milk on the brow bone and the waterline, setting it with a white eye shadow from Inglot.
For under the eye, I took the angled brush with a black eye shadow, creating a sharp line under the lashes and then creating a sharp, exaggerated tear duct. I then applied spiky false lashes under the eye and super thick lashes on the upper lid.
And there we go. All done. I promised a mental look. Next time I'm thinking a haul post, cos this bitch wants to go shopping.


