Showing posts with label Rimmel. Show all posts

Sunday, 24 May 2015

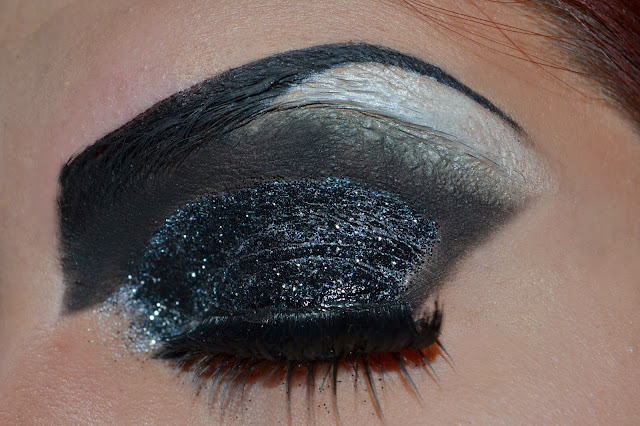
Cruella De Vil Makeup - Cos I Started Watching Once Upon A Time And It's Great

So, Once Upon a Time is an amazing show. I was finding season four a little so-so, up until they decided that the second half of the season was going to be about the sassiest bitches in fairytale land. Maleficent, Ursula and Cruella De Vil. Now, Cruella isn't an evil witch, she's just a bad person, period, and I sort of love that. Her style is also flawless, and considering I haven't driven a car since I passed my test two years, I imagine I would drive much like she does. She's a bit of an idol for me, and I love how the show portrayed her. Thus, this make up.

For this look I wanted to go somewhere between Once Upon a Time Cruella and the Disney version, with a touch of drag, cos that obsession has not gone away. You will need a glue stick.


To start with, those brows. First, brush the outer half of your brows upwards, making sure they are all in a uniform direction. Then, take a glue stick the dries clear and work it over that half the of the brow. Keep adding glue until the texture looks smooth, you can use water to smooth is a little (just dip your finger in the water and run it over the glue). Now set this with a loose, translucent powder. Next, cover this with foundation and leave to set.

For the colour, I started with a black eye shadow by Inglot and a fine, angled brush. I wanted the brows to be thick and angular, so I started by defining and exaggerated inner brow with the shadow, taking the line down the bridge of the nose a little ways. Then fill in the brows up until the arch, going beyond your natural arch and creating an exaggerated curve. Make sure the tail is nice and fine (I use an assortment of cotton buds and make up wipes to achieve this). With the shape established, I went over it with liquid liner for intensity and sharpness.


Now, skin. I started with Benefit's Porefessional to prime, I then applied Bourjois's 123 Perfect Foundation. I then used Sleek's Cream Blush in Newport Peach on the apples of my cheeks, as I wanted the cheeks to look quite rounded. Now, contouring is a big ol' deal with this look. Cruella's cheekbones are quite something, to say the least. For this, I took Sleek's contour kit and a medium sized, flat brush, which is smaller than my typical brush, because I want the contour to be a bit more intense. I contoured my cheeks, extending the line further than I typically would, and curving it under my cheek a little, making my cheeks look more rounded and defined. I blended this out using a larger, angled, fluffy brush, but went in again with the smaller brush to keep the definition. I also contoured my nose, under my jaw and my temples. I then highlighted my cheekbones, the tip and bridge of my nose, my chin and above the arches of my brows using the highlighter in Sleek's Contour Kit. I finished by setting everything with Mac's Prep and Prime Transparent Finishing Powder.

For lips I used Sleek's Matte Me liquid lipstick in Rioja Red.

Now, these intense ass eyes. I started by priming with Two Faced Shadow Insurance. I then took a stiff pencil brush and an Inglot black eye shadow to define the cut crease, making sure the outer edge has a sharp edge and that the inner corner blends into the brow. I blended it out with a fluffy brush the best I could, considering the glue stick. I then used Maybelline's Color Tattoo in Light in Purple over my lid as a base. Over that I used Collection's Glam Crystals Glitter Liner in Rock Chick as a base for Stargazer's Glitter Shaker in Onix, which I patted over the top. I then used Nyx's Jumbo Eye Pencil in Milk on the brow bone and the waterline, setting it with a white eye shadow from Inglot.


For under the eye, I took the angled brush with a black eye shadow, creating a sharp line under the lashes and then creating a sharp, exaggerated tear duct. I then applied spiky false lashes under the eye and super thick lashes on the upper lid.


And there we go. All done. I promised a mental look. Next time I'm thinking a haul post, cos this bitch wants to go shopping.

Sunday, 26 April 2015

Adore Delano Drag Makeup - The Newest Time Sink In My Life

So a dear friend of mine introduced me to a little show called Rupaul's Drag Race, and, well, now I'm sort of obsessed (I may be watching it whilst writing this). The show is camp, glitzy and right up my alley (cos makeup, fashion, puns and the camp, all the camp). I am simply in love.

One of my favourite Queens of all time is Adore Delano. She is so damn funny and her lips! I live for her lips. This here is my interpretation of her look. It's a fairly tame one, cos I'll be damned if I'm gonna really go for those brows, I am too lazy for that shit. Nonetheless, I had a lot of fun with this look.


Lets start with the skin. Drag Queens wear a whole lot of face products, mainly because they are men painting to look like women, but also a lot of them are performers, so they need makeup that stays through sweat and looks good under harsh lights. That means heavy and matte.

To start I applied a primer all over my face, as my pores are pretty awful and need covering - I used Pore-fessional from Benefit, which I got as a free sample from a magazine and actually need to buy a full thing of, as it's pretty great. Then I used my usual foundation, which is 123 Perfect by Bourjois. It's a matte foundation, as I have oily skin, it's also a long lasting one, so it fits the bill.


Next is the contouring, which is a big deal for drag. I used a Sleek contour palette and a large, angled, fluffy brush to apply colour in the hollows of my cheeks, under my jaw and at my temples. I then used a smaller fluffy brush to deepen the cheek and then to contour my nose. For the nose I blended a thin line down either side of the bridge, joining up the lines under the tip of my nose. You don't want to darken the sides of the nose too much, because it can actually make the nose appear wider.

Then there is baking. Baking (also known as cooking) is where a product is left to settle into the skin before being blended in. I used this technique to emphasize my cheek contour. I took a translucent powder - Mac's Prep and Prime Transparent Finishing Powder - and patted it underneath my contour using a makeup sponge, you want to create a really sharp line. Then you leave it for five minutes or so, I tend to leave it on whilst finishing off my eyes, or something like that. Then I just blend it away whilst finishing my skin with the same powder.

Now highlighting. So, you still want it to be matte, but also to be noticeably there. For this purpose I used a matte, white eye shadow from Inglot. I used a small fluffy brush to apply the colour to my cheekbones and under my eyes - Kim Kardashian style - then on the tip and bridge of my nose, on my cupid's bow, the top curve of my chin (to hide my butt chin) and above the arches of my brows, blending upwards. I then built a little more colour on my cheekbones, as I want them to be highlighted the most.


Now for the eyes. Start with a primer - I use Two Faced Shadow Insurance. Now, the liner is the main focus of this look, so the shadow is fairly minimal. I used an Inglot eye shadow that is three shades of a warm brown in one pan. I started with using the medium shade in the crease, blending it towards the nose. I then used the darkest shade to darken the crease. I then used the lightest shade on the lid. Next, I used Nyx Jumbo Eye Pencil in Milk on the waterline and in the inner corner, I used a white eye shadow by Inglot to set this.

For the brows I used a small angled brush and a black eye shadow. Adore's brows are amazing, so I couldn't fully replicate them. However, the gist is very dark, very angled and big on the front part. I used the shadow to create a boxy shape for the front part and a very fine tail.


Now the liner. I used Rimmel's Glam Eyes Liquid Liner, some people would use gel liner, not me, I hate that stuff. I've tried, I really have, but it does not work for me. If it works for you, use it, but I'm sticking with my liquid liner honey. Now, you want the liner to have a sharper angle at the outer edge than you would typically do, and go longer, and thicker. Start at the outer corner of the eye and draw a line towards the brow. Then draw a line on the lashes and then keep building that line until it basically fills the mobile lid. Join the line up with the outer line, creating a curve rather than a straight line.

For underneath the eye start with the exaggerated tear duct, making sure the point is very sharp. Then draw a line very closely underneath the lower lashes. Draw a line out from the outer corner, leaving a large V between the two lines, this basically going to be a horizontal line from the outer corner. Now thicken the line, taking the outer flick as a starting point. To finish the eyes, mascara and the biggest lashes you own.


Now those amazing, amazing lips. I wanted to go matte red, because a matte texture will help disguise my natural lip line. Now, I started with a No 7 Lip Pencil in Fire. I started by drawing a line just outside of my natural lips, I then built on this, not straying too far away from the actual shape of lips, whilst straying very far from my actual lip size. I then used the liner to fill in my lips. I then applied Sleek's Pout Paint in Pin Up over this, but I'd actually recommend using a lipstick. To finish, I patted a translucent powder over the top to mattify the lips, using a small flat brush, for precision.


 And there we are. A drag makeup look. I had to open the door to a pizza guy wearing this, he looked a little shocked, to say the least. Despite this, I sort of want to wear this out. Maybe I'll skip the lips.

Friday, 1 August 2014

Water Colour Nails - For When You Feel Bad For All The Nail Polishes You're Not Using

 So I recently started using Pinterest, which is great, but also steals quite a bit of my time. I keep seeing cool nail things that instantly make me want to try something new. Discounting this one 'fish net manicure' that suggested using the netting from a loofah to give you cool nails and just didn't work - like I swear to God, I tried so hard and got nothing save a huge fucking headache - I've been loving trying all these new things. I can't tell you what picture in particular inspired this manicure, but using sponges on my nails has always worked well for me, so I was on board for these nails.
 Excuse my shitty, mismatched nails
 Here is everything you will need, different colour combinations such as blues and greens would also look awesome. From left to right: Rimmel Nail Nurse (as a base coat), No 7 Nail Colour in ME! ME! ME!, Barry M Gelly Nail Paint in Rose Hip, Barry M Gelly Nail Paint in Papaya, Topshop Nails in Listen To Me and Ciaté Speed Coat Pro for the top coat. Also a sponge, this is integral to the look.
Start with the base coat (duh), and wait for it to dry fully. Then do two coats of Papaya, waiting to dry between each coat. (The paint in my image has a weird texture because of the plastic, not the formula).
Now paint some of ME! ME! ME! on the sponge and blot off some of the excess paint.
Now pat the colour onto the nail, starting at one corner and blending it towards the middle. Wait for it to dry.
 Next do the same with Rose Hip, starting from a different corner and blending so there is plenty of overlap. Again, wait for it to dry.
Now pat Listen To Me in the centre of the nail, blending out a little, but less than the other colours. Wait to dry, longer than I did as I smudged the colours together a little (if you like how that looks, wait until it is no longer tacky, but would dent if you touched it).
Finish with a healthy dose top coat. Voilá.

Monday, 28 July 2014

More Club Make Up - And My Poorly Made Life Decisions

 So, me and my friends planned a night out which happily coincided with my friend getting a job, so reason to celebrate. I did these lady's make up, as well as my own (obvs) and I think it all turned out rather cool looking. It's a shame the night did not end up cool for myself. Who knew that drinking a bottle and a half of wine in a short space of time was a poor idea? I was snug in bed before midnight, is all I'm saying about it. The other girlie's had a good time, though.
This is Megan, I've introduced her before - for her Prom make up - so you're familiar with my difficulties with her eyes. I feel I've got it down now, though. This look started with the hair. It's all about the hair. I used a teeny tiny (1/2 inch) curling tong and alternated the direction of the curls so they don't 'sit' in each other. I then got Megan to pull her fingers through the curls and rough it up a bit. Thus creating a fun and summery look. This was my inspiration for the make up.
 I primed the eyes using Two Faced Shadow Insurance. I then used a Mac 217 and an Inglot Freedom System Rainbow Eye Shadow (it's three complementing colours in one pan) to buff and orange colour all over the lid and under the eyes. I used the middle shade to do this. I then patted the lightest colour in the centre of the lid and the darkest colour to faintly darken the outer corner and the upper and lower lash lines. I then used Nyx Jumbo Eye Pencil in Milk on the waterline and inner corners. I used a shimmery white from Sleek in the inner corner and blended it slightly into the lid. I then finished with Bourjois Liquid Liner for a fine cat eye and Loreal Volume Million Lashes on curled lashes. For a Summery look I like a face to be highlighted and bronzed, so I used Topshop's Glow (a lovely golden, liquid highlighter) and Rimmel's Natural Bronzer in Sun Glow.

This is my lovely friend Jordan, who looks ever so hip in a hat. Jordan wanted something fairly simple for make up, but still eye catching. So I thought an extreme cat eye and a red lip would work, and it looks damn cool, if I do say so myself. For the lips I used No 7 Lip Pencil in Fire to line and fill in the lips. I then went over this with Rimmel Kate Moss Lipstick in 01. I used a piece of toilet paper split open (as in it is always two pieces of thin paper stuck together to create a sheet) and Mac's Prep and Prime Finishing Powder to blot and mattify the lips.
 I used Maybelline Gel Eyeliner and the brush that comes with it to do the extreme cat eye. I first made a very fine line across the entire upper lid, extending the line quite a distance from the outer corner. I then thickened the line slightly starting with the other point, but keeping it fairly consistent across the lid. I did not want a '60s cat eye, I wanted something more modern, so I kept the line fairly straight from the outer corner and not too angular in the flick. I then lined under the lower lashes, leaving the waterline clean and I connected it with the upper line at both corners, creating a small point in the inner corner.
 For myself I just did a look I'm rather fond of, which, whilst extreme, I do adore. I used the Maybelline gel liner to outline and fill in the shape and then set it with Urban Decay eye shadow in Prank, from the Vice 2 Palette. I used Nyx pencil in Milk for the waterline. I used Eylure lashes in Dramatic 202. My skin routine is the same as detailed in previous posts (yeah, I'm lazy). For my lips I patted on some Rimmel Kate Moss Lipstick in 20.
So this night was a messy one for me, but my make up looked fabulous, so there's that.

Wednesday, 16 July 2014

Cyborg Make Up - For When You Want Your Exterior to Reflect Your Cold, Hard Heart

So, this is my friend Zoe. She is stunning and I swear to God hew face is just a dream to put make up on. She's has lots of lid space for me to play with, plus full lips and great bone structure - she makes my job easy. So whenever I can get my hands on her face for make up purposes, I do. I always end up doing something extreme and a tad weird, because she's not going to go out with it and it's my time to have some fun.
This time around I did cyborg make up. I can't tell you why, probably something to do with my love of doing fake tears. Liquid metal tears seemed like a fun thing to do, so I built the look around that concept.
 For the face I used Bourjois 123 Perfect Foundation in Light Vanilla, I contoured and highlighted with Sleek's Contouring and Blush Palette in Light. For the brows I initially brushed some concealer through them to lighten the hairs, I then covered the brows in Collection Glam Crystals liner in Hustle. For the Lips I patted Rimmel Kate Moss Lipstick in 01 in the centre and blended it towards the edges.
I used Urban Decay's Vice 2 Palette for the eyes. In the crease I used Rewind, which I then darkened with Lovesick. On the lid I used a base of Nyx Jumbo Eye Pencil in Milk which I then pressed Shellshock over. I used Nyx Jumbo Eye Pencil in Black Bean on the waterline which I set with a black eye shadow. I then used a Bourjois Liquid Liner to create a cat eye. The lashes are Fever Lashes, which can be bought at Smiffy's (which is where I got them).
 For the tears I used a small brush and Rimmel Kate Moss Lipstick in 01. Using a lipstick gives a shinier texture than a shadow, it also has a more translucent consistency if blended enough which worked well for what I wanted. I wanted the red to be a bit like the flesh being burned away by the molten metal tears. I then used Shellshock - previously mentioned - over the red to create the molten tears. I then covered the tears with clear gloss to make them look more liquid-y.
 For the Metal Panel in her forehead used gel liner to outline the area I wanted, I then filled it in with Nyx Jumbo Eye Pencil in Milk, which I then set with Shellshock. I then used the gel to add more lines and some dots to look like bolts. I then used Collection Glam Crystals Liner in Dancing Queen for the red lines and Madness from the Vice 2 Palette for the blue lines.

I then proceeded to take a billion photos because Zoe kept pulling silly faces. To be fair to her though, I did just do this to her face.

Tuesday, 8 July 2014

Prom Make Up - Another of my Beautiful Friends

My lovely friend Megan recently had her Year 13 Prom, which is the last year before University. It's an event to say goodbye to your school, your teachers and all those people you intend on un-friending from Facebook once you get to Uni. Most people are over eighteen so everyone drinks, like a whole lot - the teachers more than anyone. Because nothing says goodbye like passionately professing your love for someone you haven't talked to all year.

Megan didn't want anything to extreme, but also something that wasn't too 'prom'. We had a Prom post-GCSE's where everyone wore their satin and bejewelled dresses, this Prom is more inclined towards party dresses. The make up has to be similarly themed. For my GCSE Prom I had a neutral eye with a soft pink lip, for my A level Prom I had blue glitter on my eyes and an orange lip gloss - you get the idea.

So, considering Megan's eye shape which always proves a challenge for me (and I can't nail down exactly why), I wanted something heavy on the eye liner and light on everything else. This make up was a process for me, but I'm happy with how it came out and Megan looks gorgeous (it would be hard for her not to).
I started with lightly brushing Cork by Mac on the outer corners of the eyes, not so much in the crease because of the shape of her eyes. I then patted Inglot's Body Sparkles in 71 all over the lid (I'm overusing this at the moment, so sue me). I then did a cat eye with a liquid liner. Whilst waiting for this to dry, I ran some Cork through her brows, very softly. I then decided what was best was to line underneath the bottom lashes with a liquid liner, giving a very sharp line, versus using a pencil liner. I then completed it by using Nyx Jumbo Eye Pencil in Black Bean on the waterline and setting it with a black eye shadow (I used one by Inglot). Now happy with how the eyes looked I piled on mascara - to compete with the heavy eye liner - and applied a pair of simple Eylure lashes.
 Megan's skin is lovely, so I used a light foundation, just to even the skin tone. I then applied Sleek's Blush by 3 in OC to the apple's of her cheeks, with my own cheeks I usually pull the colour up to the sides of my face, but for Megan I kept it central. I then finished with Mac's Prep and Prime Finishing Powder. For the lips I just smudged Rimmel's Kate Moss Lipstick in 22 onto them, just giving a slight hint of colour that can wear off happily and prettily through the night.
 For the hair I used a 1 inch curler (my medium sized one) and alternated the direction of the curls, so that they won't sit in each other and flatten the look. I wanted something fun and flirty. I also added volume to the roots using Tressemé's Plumping Powder and back combing with a tail comb. I then got Megan to run her fingers through the curls to loosen them and messy up the look. This style is one meant to be messed about with.

Overall I was very happy with how the look turned out and I think Megan looked gorgeous. She also made her own Prom dress, how cool is that?

Saturday, 14 June 2014

Mini Haul - AKA I Lack Self Control in the Face of Make Up

So I ran out of concealer, no big deal, just pop over to Boots and pick some up. HA HA HA HA. I can't just walk past a Barry M display. They constantly bring out new shades of nail polish and it just kills me because I want them all. This time around there was an offer that if one were to spend over £6 one could get a free limited edition polish, there were two colours, a blue and then one I bought - that stunning coral with a slight gold shimmer running through it. I mean, who could pass that up? Definitely not me, because there were also many other new gel polishes, I picked up a very pale pink and a pale olive. I rather like the gel formula, so bonuses all round (save for my poor overused purse).

And then I was buying things already so I bought two lipsticks from the Rimmel Kate Moss range, which, as my previous post shows, are some of my favourite lipsticks. I couldn't resist getting a darker shade, but I also wanted something more Summer-y. The texture of these is creamy and lovely.

Then to finish it off I bought a base coat from Rimmel that is supposed to look after the nails. I don't know if it's going to heal my much abused nails, but it did work as a really nice base coat.
 Can we talk about how cute the packaging is for all the special Barry M polishes?
From left to right: Olive, Rose Hip, Carouse! (Exclamation Mark is very much part of the name).
 Look at the gold shimmer in Carouse!, I've found my Summer shade.
 Rimmel Kate Moss Lipsticks in 16 and 30.
I feel like this shade is perfect for me. It's not even too dark for Summer - seriously, I feel odd wearing way dark lipsticks when the weather's this nice, knowing England it won't last much longer though.
 Nice even colour from one swipe, parfait!
 A lovely pinky coral, perfect for this weather and it'll look amazing with a tan.
 Being a pale colour it sinks into the cracks of my lips a little, but from a typical distance someone should stand from you it looks just fine, and if someone's getting up close and personal with your mouth that lipstick's not staying in place for much longer anyway.

Wednesday, 11 June 2014

My Favourite Lipsticks - And My Perhaps Questionable Taste

I thought I'd do a post documenting my favourite lipsticks of this moment. In general I lean towards Rimmel when it comes to lipstick; they are affordable, there are many colours, the texture is smooth and they are well pigmented. In particular, I love the Kate Moss shades - I have never been disappointed them.

For me, lipstick is all about colour. I'd sacrifice wear-ability and texture for colour any day. Lipstick can transform an everyday look into something striking and special. If I'm late in the morning and can only stretch to a cat eye, a lipstick is my jam. I can sleep in that extra half hour and still look fierce.

Then there are the lipsticks I want to just add a bit of colour to my lips, but not to compete with my eye shadow. These also tend to be my Summer shades, not that seasons really affect what I wear. The weather has been great recently and I've almost exclusively been wearing dark colours. I'm and Autumn girl at heart.

Height order, of course.
 This is Rimmel's Lasting Finnish Lipstick in 128 Starry-Eyed.
 This colour is my night out go to. I usually apply it as a stain, patting it on my lips focussing on the centre and blending it out. It's super sexy like this, wears really well and won't cause trauma if you want a sneaky kiss. However, for day time it's great worn at full pigmentation from the bullet.

 The colour looks darker in person, but is not too dark. It's a perfect colour if you want to branch into burgundies but don't want something that reminds you of your teenage self (we all had goth phases, right?). The texture is super smooth and applies consistently. It is fairly forgiving to dry lips, it's not gonna have the results of a lip balm, though. The wear-ability is just fine, but it won't last through a meal. However, it will survive many glasses of wine (meaning a bottle to oneself).
 Another Rimmel, this is 01 from the Kate Moss Lasting Finish Lipsticks.
 This is my perfect red, man. It is a rich, blood red that is the sexiest lipstick I own. If you want a pin up red, this will do you nicely. This lipstick is pure sass for me. Pair this with a cat eye and some false lashes and you are sorted. When I want to bring my A-game, this is the lipstick I pick up.
 The texture is a dreamboat and it lasts a good long while, although if you're eating a burger, tops ups will be necessary. The colour is perfect first swipe. It is also fairly forgiving to a dry lip.
 My final Rimmel lipstick in this post, another Kate Moss one, it is 101.
 This is a lipstick I gravitate towards when I have got a whole lot going on with my eye shadow. It is a matte, but applies easily and smoothly. It's paler than my natural lip colour, so it can give a nice '60s feel to a look. It is not hugely pigmented, this doesn't bother me over much, as my own lips aren't very pigmented. However, if you have naturally red lips, you might want to blank them out with concealer before using this lipstick. This doesn't mean the pigmentation isn't there, it's just a pale colour to begin with.
 Now, this doesn't look so good close up. It settles a little in the cracks of your lips. That means this can't be worn if you have cracked lips. I've tried, then looked in the mirror and instantly changed the lipstick. It's a no go. This lipstick is a matte, so it's not hydrating, but it doesn't dry the lips either, it applies smoothly. Despite its limitations, it looks incredibly good with a dark eye, which is why it has a place in my favourites.
 This is my other 'complimentary to a heavy eye' lipsticks. It is also my go to Summer colour. If the sun is beating down, this colour is on my lips. It is Revlon Lip Butter in Tutti Frutti.
 For a Summer lip colour I want a sheer orange. Period. Orange looks good with my skin when it's slightly more tanned. Now, I bought this because beauty bloggers could not recommend it more, and I completely agree. It applies with ease, utter ease. It is a super low maintenance lipstick, and that is perfect for a sweaty Summer day. It wears off quite nicely, but can do that annoying crusting on the inside of the mouth, which is pretty gross. But because this colour is sheer, you can just rub it away and still have the colour on your lips.
It doesn't apply as evenly as I would like, but the edges can be happily blurred by using a finger to make it look nicer. It is flattering for dry lips and actively hydrates. The staying power is so-so for me, but that's because it is a sheer colour, so I don't pay as much attention to preserving it as I would with a darker colour. But I love it for how low maintenance it is. It is a no fuss lip colour, and a girl needs that sometimes.
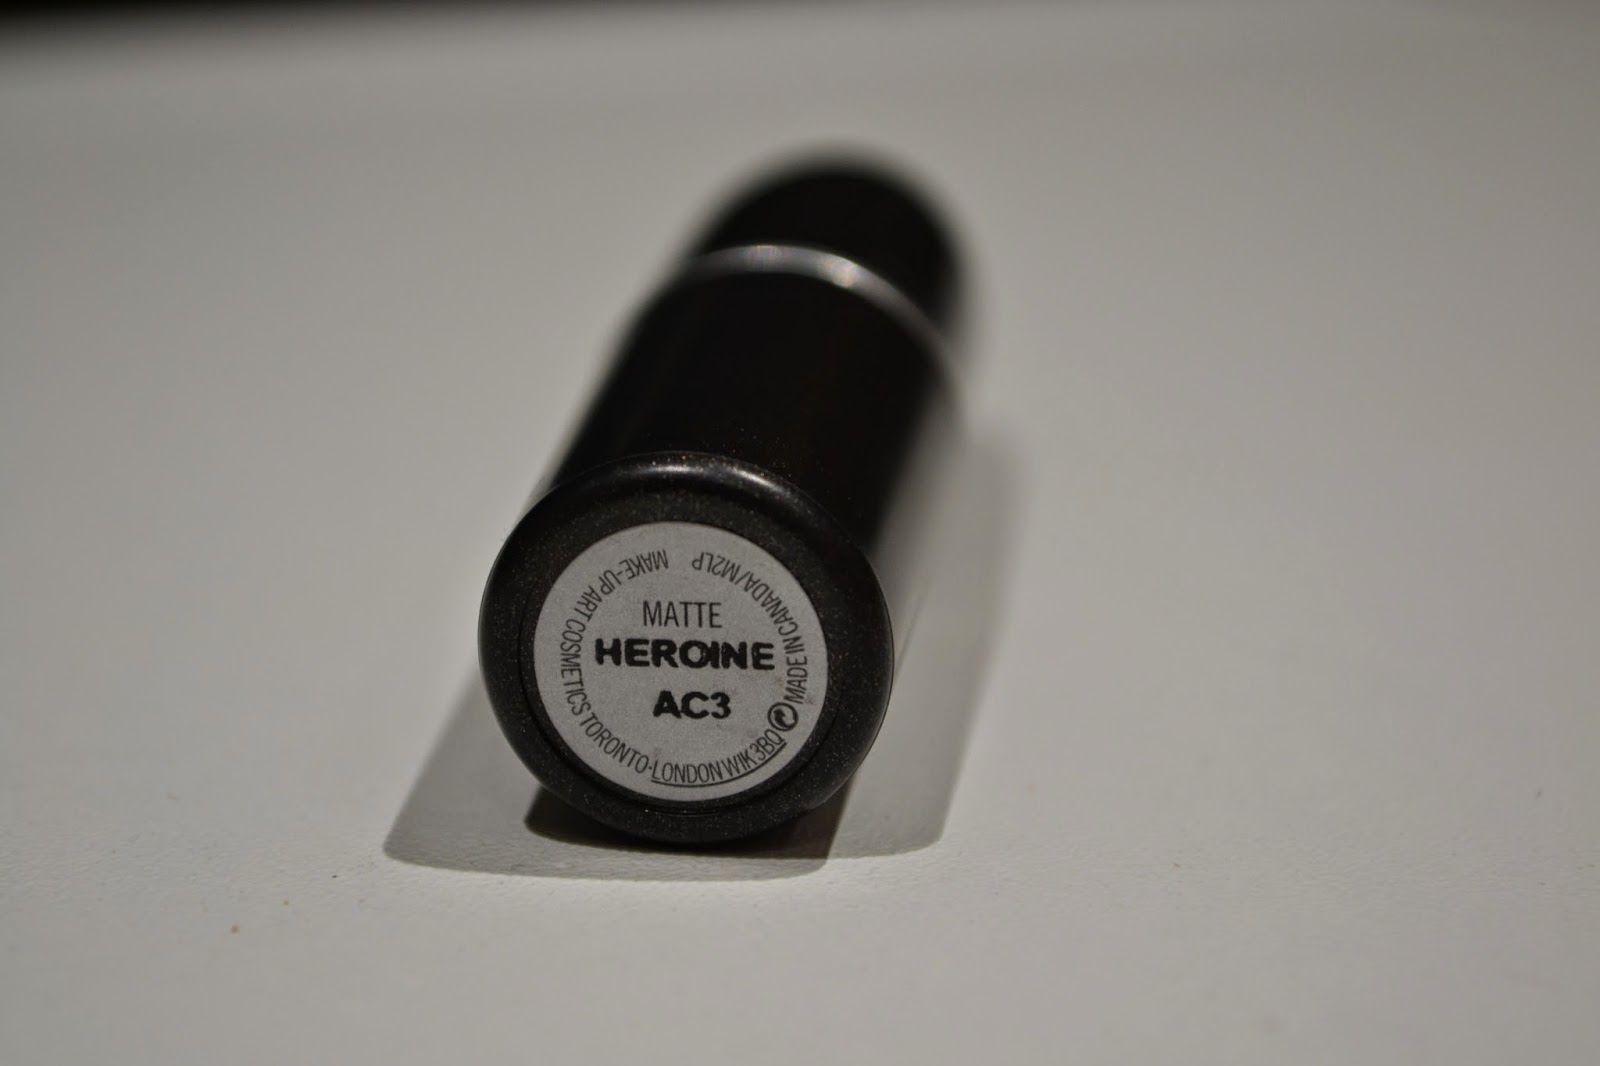
 This is a recent purchase for me and my first Mac lipstick. It is called Heroine, not the drug.
 I have very little to say about this except the colour, yo. It is full on bright purple and I adore it. I've been wanting to branch out with my lip colours and this is totally perfect for it. Because it is a striking colour, there is very little doubt about that, but it is also not green or blue, so it's not completely outrageous. This is a go to for me if I want to look super stylish but haven't had the time to do anything interesting with my eyes. I tend to get compliments on it too, which is always rather lovely.
 It's Mac, so it's pricier than I would like, but you do get what you pay for. It's a matte colour, but applies super smoothly and comfortably. The wear is great, but won't be nice on dry lips. Depending on what I'm wearing this colour can be goth-y, but also Summer-y. It's surprisingly versatile and if I'm going out, but not wanting to go on the pull, I wear this shade. It is my fashionista shade.
 Now this lipstick is an iffy one for me, the colour stops my heart from how much I love it, but the formula leaves a whole lot to be desired. It is Depth by Topshop. Also, this packaging, though.
 This is a deep dark purple, it photographed lighter than it is. It is also less red in person. It is a red toned purple, but is definitively a purple. This is another shade that is all about style for me. It is a lipstick that speaks for itself. It is also very gothic. I have fairly warm colouring and couldn't look like a goth even if I tried, which means the lipstick isn't too much for me. This is very much a Winter lipstick for me, despite being incredibly unforgiving on dry lips. It is a very wet lipstick, which means it slips and slides around when applying, meaning getting a consistent coat is a little hard. I promise it looks better in person, though. Flash does nasty things to this lipstick, apparently.
 Up close like this it looks like a hot mess, but looking closely in a mirror does not reveal the imperfections. Again, evil flash. The wear isn't great, but I don't mind reapplying during the day. This lipstick is purely colour for me. I had been looking for a dark wet colour for such a long time and this stumbled and hobbled into my life. It's a pain, but it's fabulous enough for me to look past it. And that's what love is.
 Lastly, this is my number one boo. I've had this lipstick for years and it's still my favourite. It is a matte burgundy called Vamp by Sleek.
 This is a matte, so the wear is great, but it's hella unforgiving on dry lips. It's worth using a lip scrub for though. It takes about two coats to get it to the colour you want and it's very dry, but once it's there, it is there. Again, it photographed lighter than it is in reality, but not by a huge amount. It, like Starry-Eyed, is not so dark as to be too out there, however, the texture makes it less of a viable choice for those not so comfortable wearing lipstick. This is not a colour I would apply on my friends, but it is still my favourite.
 It borders the line between typical lip colours and outlandish ones (Tutti Frutti at one end and Heroine at the other). It is just out there enough to be striking, but not so much as to get funny looks. Which means it is exactly what I want out of a lip colour. This is my Autumn lipstick. As soon as September begins, I crack out this lipstick. Beautiful.