Showing posts with label MUA. Show all posts

Tuesday, 9 August 2016

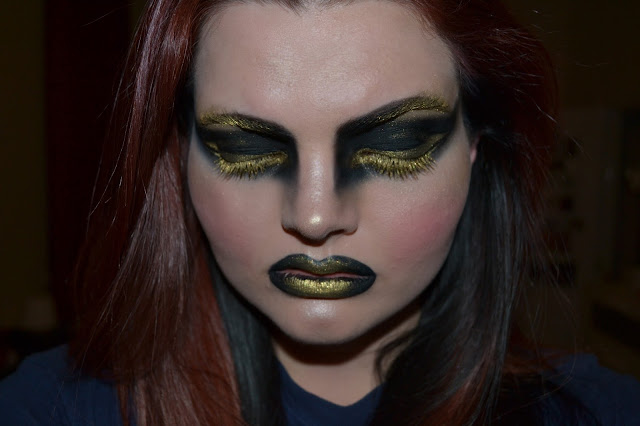
Gilded Makeup - Because Black And Gold Is The Best Colour Combination

Today I'm showcasing a look I did a little while ago which I'm choosing to call 'Gilded Coal Makeup'. It was inspired by me buying Illamasqua's Liquid Metal Palette, which is gorgeous, if not a little impractical as cream shadows always crease for me. In the palette is a beautiful, bright, true gold - as in, not too yellow toned.

Black and gold is one of my favourite colour combinations, so I figured I'd pair the two in a look. This could be a kind of District 12, Katniss Everdeen Ceremony look, if the Hunger Games is still relevant. Otherwise, I thought it looked dope.


I started by priming my lids with Too Faced Shadow Insurance, of course, this kind of look needs a good primer. I then used Urban Decay's Perversion Eye Pencil all over my lids, blending out the edges with a slightly denser, fluffy brush - my favourite is Real Techniques Base Shadow Brush. Using the same brush I set this base with a black eyeshadow from Inglot, then blending the shadow out towards my temples, up to the start of my brows and to an extended point on my nose. I deepened the colour by keeping packing on the shadow as it takes a while to get black eyeshadow really dark on the skin.


Now comes the fun bit. I took the gold shade - Electrum - from the Liquid Metal Palette and applied it as winged eyeliner, both on the lid and under the lower lashes with a fine, angled brush. I connected the two in and extended inner corner and created a double wing at the outer corner. I then set this with Barry M's Dazzle Dust in 10 (a gold). I sharpened the lines using a black liquid liner. I then applied Electrum on the outer two thirds of my brows, brushing the hairs upwards. I again set this with the Gold Dazzle Dust, also brushing it on my brow bone.


Next, I curled my lashes very thoroughly as I was not going to be using proper mascara. I started by applying a white lash primer, I then topped this with Electrum, applying it with a spooley. I then set this all with the Gold Dazzle Dust. I made sure to do this to both sides of my lashes and had to do it a couple of times to get the full effect.

For my skin, I primed with Benefit's Porefessional, used Mac's Studio Fix Powder Foundation, Nars' blush in Outlaw, Benefit's Hoola to contour and Topshop's Glow and Sleek's Subsolar from the Solstice Palette to highlight.


For my lips I started by lining them with Perversion Eye Pencil, I then used MUA's Luxe Velvet Lip Lacquer in Potent all over the lips. Then I applied Electrum in the centre of the lips, setting it and blending it out with the Gold Dazzle Dust.


I then decided to spruce the look up a bit, because I was a little dissatisfied. I started by applying proper mascara on my lashes (after all that work), which immediately changed the look. I then used Inglot's Eyeshadow in 50 to soften all the edges of the black eyeshadow.


I finished by applying the red eyeshadow to my cheeks to tie the look all together.

I actually quite liked this look by the end of it. I have no idea if this could be themed for a costume, but hey, it was fun to do and looks pretty damn cool.

Thursday, 4 August 2016

FOTD - Gay Pride Makeup

As Gay Pride is happening in Brighton this weekend I thought I'd share the look I wore to London Pride. I worked the morning of and the day after Pride, but I desperately wanted to go, as it would be my first ever Pride.

I had a wonderfully time and it felt so good to be surrounded by people in my community. One of my friends also went in drag and had so many people coming up to him to appreciate it, it was great.


I wanted to have really done skin, so I started with Benefits Porefessional as my Primer. I then used Mac's Mineralize Concealer under my eyes and around my nose and mouth. I used Mac's Studio Fix Powder Plus Foundation over the top of this. I contoured with Benefits Hoola and highlighted the tops of my cheek bones, my cupid's bow, my nose, my chin and my forehead with Becca's Shimmering Skin Perfector in Moonstone - the more plastic looking the better. I then used Nars' Super Orgasm as my blush.


 I outlined my lips with Mac's Boldly Bare, slightly overdrawing them. I then used MUA's Luxe Velvet Lip Laquer in Serene as my lip colour. On my brows I used Mac's Cork on the inner section and Inglot's 329 for the rest of the brow, I then used No7's Lash and Brow Perfector to keep all the hair's in place.


For my eyes I started by priming my lids with Too Faced Shadow Insurance. I then used Cork in the crease, deepening it with Inglot's 329. I then drew a fine line under the lower lashed with 329. I then applied Lit's Glitter in Champagne Wishes on the lid, using Lit's Clearly Liquid Glitter Base. I then used So Susan's Haute Light Highlighting Pencil on my waterline and in the inner corner, setting this with Inglot's Body Pigment Powder in 180.


To finish, I drew a cat eye with Bourjois's Pinceau Liquid Liner, applied Urban Decay's Perversion Mascara and used both top and bottom false lashes, both from Eylure, setting everything with Make Up For Ever's Mist and Fix Spray.


To complete the look, wear excessive amounts of sparkly jewellery, completely curl your hair and wear a dusky pink, faux satin, slutty Prom dress. The handsome man with a purple glitter beard is optional, but recommended.

Happy Pride!

Tuesday, 17 November 2015

November Glossy Box - The Autumn Box

This months box is all about Autumn beauty. Which is all about warm tones and slightly more dramatic makeup. Autumn beauty is my jam, so I was looking forward to this box.


Our first offering is Royal Apothic's Body Lotion. The full size is worth £14.50, but the box contains the travel size (which is still a good amount).


I haven't yet used this, as I tend to hate how any kind of body lotion feels on my skin. It's supposed to be used post-shower. Hopefully next time I shower I'll remember to try this out as the bitter cold of this time of year really is affecting my skin.


Next is Emite's Diamond Heart Primer. The full size retails at £25.90, but again, this is a travel size. This primer feels quite a bit heavier to apply than my usual Porefessional from Benefit, but once applied it feels fine. It's a little sticky, but this helps with the staying power of products applied on top of this. Overall I like this product, and have been reaching for it instead of Poreffesional.


These are Eylure's Natural Lashes which, of course, are full sized and retail at £5. I love Eylure lashes, so this was a lovely addition to the box. They are a great deal more natural than I typically buy, but that's really nice, as I feel I could wear these everyday without anyone noticing I'm wearing falsies.


This is Revlon's Super Lustrous Lipstick in Black Cherry which sells for £7.99. I was able to choose the shade out of four options, so of course I went for the darkest one. The colour is gorgeous, but I'm not overly enamoured with the formula. I hate lipsticks that are supposed to be hydrating, as I feel they are just slip and sliding around on my lips (it doesn't help that my lips are very dry at the moment). To get a clean finish with this lipstick I have to apply it with a brush, which I sort of resent having to do. I'm still wearing this regularly, though, cos I love the colour.


To finish, we have MUA's Undressed Palette. Which has a lovely selection of neutral tones with some transition-into-night-time shades.


I'm a bit so-so about the formula of MUA eye shadows, especially their mattes. There is only one matte in this palette and its pigmentation is actually quite good. All the other shadows apply nicely as well. Overall, I quite like this palette.


From left to right, top row to bottom row, the shades are: Puff, Rose Ash, Fawn, Gild, Hazel, Lion, Bronze Ore, Burnished Brown, Tawny, Henna, Fuel, Cool Grey.


In this photo I used the Emite Primer as a base, followed by Mac's Studio Fix Powder Foundation, Sleek's contour kit and Revlon's cream blush in Coral Reef. I used Two Faced Shadow Insurance as a primer for my eyes, with Hazel in my crease, Gild and Henna on my lid, Puff in my inner corner and Fuel underneath my lower lashes and on my upper lash line. I'm wearing Loreal's Volume Million Lashes as my mascara along with the Eylure Natural Lashes. On my lips I'm wearing the Revlon Lipstick.

Bring on the December Box, which I hope is suitably festive.

Tuesday, 19 May 2015

Women Of Shakespeare - Juliet, Something Neutral For Once

So this look has been sitting on the back burner for a while, as you can tell from the colour of my hair. And by that I mean I wore this look Christmas shopping. I've been busy. Really busy actually, as I had my last of four exams today and I started my new job three weeks ago. It has been a seriously intense month and I am so happy to see its close. BUT, positives; I have a job and thus more money to buy make up and now I have a Summer to read books and paint my face, so upsides.

Juliet is possibly Shakespeare's most identifiable heroine. Most people I've met had to study Romeo and Juliet in school, those that didn't would be familiar with the story anyway - it's iconic. And Baz Lurhmann's film is pretty darn amazing, so there's that.

Juliet is a thirteen year old girl who's beauty puts the moon to shame, which, I personally feel, is hard to bring to life. However, I attempted it. Now, Romeo uses a whole lot of light metaphors when talking about Juliet; she is pale and glowing - so skin is a big deal with this look. With the rest of the look I wanted to look youthful, natural and girly. I take a pinch of salt when it comes to natural, and I'm not sorry about that.


First off the skin. I used Benefit's Porefessional to prime, because my pores are just horrible and this product disguises that. I then used my typical foundation, which is 123 perfect by Bourjois in Vanilla. I then contoured with Sleek's contour kit because I was going out and it makes my face look better. If I were not leaving the house, I would cut out the contour to make the face look rounder and more youthful. But with my face, even with contour, I'm getting that anyway. I then used Sleek's cream blush in OC. Now, highlighting. I used MUA's Shimmer Highlighter in Pink Shimmer, which I feel works well for this more girly look. I applied it to my cheekbones, my chin, my cupid's bow, the tip and bridge of my nose and above my brows because I wanted to glow brighter than the moon. I finished with Mac's Transparent Finishing Powder, because I have oily skin.


Now, eyes. I primed with Two Faced Shadow insurance to start, I then almost exclusively used the shadows from Sleek's Au Naturel palette, the only exception being Mac's Cork. I took a fine, angled brush with Cork and drew a line just above my crease and then winging it out at the end, dipping a little down to the outer corner to create that triangle shape. The colour will drag, so apply with short strokes that build upon each other. Doing the crease like this will make the eyes appear a little bigger. I then darkened this line with Bark from the Au Naturel palette using the same brush. Then take a clean blending brush to soften this line a little. I then took Nyx Jumbo Eye Pencil in Milk and applied it all over my lid, inner corner and water line, blending it in with my finger. I then applied Honeycomb from the Sleek palette over the top of this, all over the lid. In in the inner corner I applied Nougat and blended it onto the lid, right up to the exaggerated crease.


 I then used Bourjois' Pinceau Liquid Liner to apply a very thin winged line, again, to make the eyes appear bigger. I applied a touch of Bark under the eye, using an angled brush and finished with mascara and some wispy false lashes (Demi-Wispies by Ardell if I remember correctly.


Then, to finish, the lips. I applied a red lip gloss by Barry M to the upper lip, I then rolled my lips together a little for the basis of the ombre on the lower lip. I then dabbed a little more colour on the centre, blending it out with my finger.

And here it is, a moderately natural look. The next look will not be, I glued down my eyebrows and everything for that one.

Thursday, 28 August 2014

Bird Makeup - Utilising Crazy False Lashes With Even Crazier Makeup

So I recently wrote a blog post about a Nyx haul I did, and in that haul was this handsome pair of lashes with red feathers sprouting from their outer corners. Thus, this look was born.
I recently saw a showing of a performance of The Tempest at The Globe (the original performance being at the Globe, I saw a recording of it at a cinema, where it was so nice not to have to stand throughout the entire three hours). In this performance the actor who played Ariel had this really cool makeup on, which was a wash of red extending from his eyes towards his temples. I was inspired. So with this in mind and these beautiful lashes, I came up with this look.
 All the shadows I used are Inglot. The red is shade 382, the yellow is 343, the white is 373, the peach on the lid is 612 and the dark purple in the crease is 452. On the lips I used No 7 Lip Pencil in Fire, with Rimmel Kate Moss Lipstick in 01 over that, followed by Barry M Lip Gloss in Valentines. On my skin I used a mix of Bourjois 123 Perfect Foundation in Light Vanilla and Stargazer White Foundation. I blended the red eye shadow into my cheeks as a blush, used Sleek Contouring and Blush Palette to contour and used MUA Pink Shimmer Highlighter on my cheekbones, nose, cupids bow, chin and forehead. 
 For my brows I put Nyx Jumbo Eye Pencil in Milk on to a spooley and pulled it through the hairs. I also used Milk on my waterline and inner corner. I used Bourjois Liquid Liner for a Cat eye to better blend in the lashes. The lashes are, of course, Nyx Super Power. I also used Nyx Jumbo Eye Pencil in Yellow as a base for the yellow shadow.
Et Voila!

Wednesday, 20 August 2014

Haul Of All Sorts - Literally No Excuse For This One, I Have A Problem

I've been popping up and down to London like nobody's business these past few weeks house hunting (which is a soul sucking experience). This has given me the excuse to be around well stocked Boots and Superdrug stores (I shop to forget). And, well, you get the idea. I bought some things and thus far I'm loving all of them.
From Left: Real Techniques Stippling Brush; Real Techniques Miracle Complexion Sponge; MUA Lipstick in Shade 1; Seventeen Rock Hard Nail Effects in Blue; Seventeen Rock Hard Couture Nail Effects in Charm Bracelet; MUA Undress Your Skin Shimmer Highlighter in Pink Shimmer.
 Real Techniques Miracle Complexion Sponge: 
This sponge is just so God damned brilliant. It just makes foundation and concealer look like I've always wanted it to look. Smooth. No unfortunate thick patches of colour, or streaks. This just blends it all away, baby. I wish I'd bought this sooner. The shape is great for doing different areas of the face, like I use the point for under my eyes and around the nose and the flat section for the rest of my face. I use this to blend in concealer and to blend foundation after it has been applied.
Real Techniques Stippling Brush: 
Again, I love this brush. I've a few Real Techniques brushes already in my collection and not a one has disappointed me. The bristles are wonderfully soft, the handles nice to hold and I'm rather in love with the different colours. I have a friend who needs all her brushes to be black with a silver ferrule - like Mac brushes. I, on the other hand, rather like the hodge podge of colours that my collection is. 
 The sparse bristles at the top allow a nice light, even coverage, and boy does it deliver. My face is looking pristine with this brush coupled with the sponge.
 MUA Undress Your Skin Shimmer Highlighter in Pink Shimmer: 
I'm an avid watcher of Nikkie Tutorials on YouTube and she has recently been recommending this highlighter. Now, seeing as this is MUA and therefore hella cheap, I made it a goal to purchase this.
 Seeing as I own a total of two highlighters, this seemed like a good investment to me. I have a liquid highlighter that is very gold toned, and a powder highlighter that is also gold toned, but to a lesser degree. So having a colder, pink based highlighter seemed like a good idea. The packaging isn't the best quality, but I think it looks good and it will hold together.
On the left is the highlighter blended out and on the right it is a single swipe of my finger. So it has good pigmentation, and the shimmer is just darn pretty. Which is all I really want out of a highlighter.
 MUA Lipstick in Shade 1:
This is another product recommended by Nikkie Tutorials. She recently did a review on her blog of MUA lipsticks, two were disappointing, this one was not. And she's right, cos this Lipstick is great. The best bit? It cost £1. The packaging isn't the prettiest I have, but it's functional, and I like the colour being at the bottom (it's actually functioning lipstick too!).
The colour applied like a dream boat. Smooth and pigmented in one swipe. The colour's also just great. Because who doesn't like a nice, rich red? The wearability is also pretty great, considering I wore it on a night out and I only had to reapply once. If your lipstick's still intact at four in the morning, it's a keeper.
 Seventeen Rock Hard Couture Nail Effects in Charm Bracelet and Seventeen Rock Hard Nail Effects in Blue:
 Now a friend of mine has been wearing Charm Bracelet for about two months now and every time I see it, I want it. I mean, just look at it. So I finally found it in a Boots and snapped it up. The colour does not disappoint (for both of them). I have been doing two coats, but one is perfectly acceptable, especially for Charm Bracelet. Also, being the formula that it is, it dries in no time and doesn't smudge, which makes me so happy.
These have both had two coats of colour.
Now here's the crux, these chip like little bitches. Like, I will have at least three nails chipped at the end of each day. I tried applying top coat, no dice. The only consolation is that it dries so quickly that fixing the manicure is a breeze. Also, the texture enables that even with many patch ups, the nails still look nice. So, this has been the longest manicure I have in a while, and that says something.

Emmeline out.

Thursday, 10 July 2014

Burlesque Make up - The Film Not A Potential Career Path

 So Netflix, yo (I'm saying yo because I'm currently watching Breaking Bad, and that's also a direct result of Netflix, so, yeah). I have entered a wonderland of sub par romantic comedies that I can watch at one in the morning. It is pretty great, if not a little harmful to productivity. The point of this is that I watched the film Burlesque starring Christina Aguilera  and Cher and the runaway best part of the movie is the make up. And I'm not going to let you disagree with me, because you would be wrong. Not because the movie was bad, but because the make up is that good. It's sparkly and colourful and walking that line of not quite yet looking like a drag queen. That line is my line. I live that line.
I didn't really plan to do this, but I got inspired and decided to start playing with my make up and I ended up with this, which I'm fairly happy with. Ignore that I'm in my pyjamas.
 I started by filling my eyebrows in with a black eye shadow - I used an Inglot one and proceeded to use that one for the rest of the look. I made the line as fine as my brows allow and sharpened the edges by using a concealer. I wanted this to be fairly drag. I then took and angled brush and a black eye shadow and drew a line just above my crease and elegantly swept it out just beyond the end of my brows. I then used the same shadow to draw a wing and line around my entire eyes. Then I used Nyx Jumbo Eye Pencil in Black Bean on waterline, setting it with shadow.
 Next was the lid where I had no choice but to use glitter, like, come on. I used my finger to apply a base of the pale pink shade in MUA's Glitter Eye Palette in Twilight - this stuff is super sticky and creases so use it with caution. I then set this with Stargazer's Glitter Shaker in Garnet which is all kinds of pretty. I then went over the black shadow with gel liner to give a cleaner line. This is when I created the point in the inner corner. I finished with healthy amounts of mascara and Eylure Dramatic Lashes in 202.
I used Bourjois 123 Perfect Foundation in Light Vanilla and Sleek's Contouring and Blush Palette in Light to contour and highlight. I used a smaller brush than usual to contour so as to give slightly sharper lines, especially round my nose, I then blended this a little with a larger brush - fine line of drag, yo. I then used Revlon's Photoready Cream Blush in Coral Reef on the cheeks. I set this all with Mac's Prep and Prime Transparent Finishing Powder.
I over drew my lips, because who cares about subtlety? I used a No 7 Lip Pencil in Fire to entirely fill in my lips, which I then covered in Sleek's Pout Paint in Pin Up. To finish I put a reasonable amount of clear lip gloss on my hand, then using my finger to pat unto my lips, so the colour doesn't get smudged around by an applicator. And I was done. Cue taking many photos of myself at an inappropriately late hour to be awake. Finis.